Built-in Objects
Pygame Zero provides useful built-in objects to help you make games easily.
Screen
The screen object represents your game screen.
It is a thin wrapper around a Pygame surface that allows you to easily draw images to the screen (“blit” them).
-
class
Screen¶ -
surface¶ The raw Pygame surface that represents the screen buffer. You can use this for advanced graphics operations.
-
bounds()¶ New in version 1.3.
Return a ZRect representing the bounds of the screen.
-
clear()¶ Reset the screen to black.
-
fill((red, green, blue)[, gcolor=(r, g, b)])¶ Fill the screen with a solid color.
New in version 1.3: If
gcoloris given then fill with a gradient, fromcolorat the top of the screen togcolorat the bottom.
-
blit(image, (left, top))¶ Draw the image to the screen at the given position.
blit()accepts either a Surface or a string as itsimageparameter. Ifimageis astrthen the named image will be loaded from theimages/directory.
-
draw.line(start, end, (r, g, b), width=1)¶ Draw a line from start to end with a certain line width.
-
draw.circle(pos, radius, (r, g, b), width=1)¶ Draw the outline of a circle with a certain line width.
-
draw.filled_circle(pos, radius, (r, g, b))¶ Draw a filled circle.
-
draw.rect(rect, (r, g, b), width=1)¶ Draw the outline of a rectangle with a certain line width.
Takes a Rect.
-
draw.filled_rect(rect, (r, g, b))¶ Draw a filled rectangle.
-
draw.text(text, [pos, ]**kwargs)¶ Draw text.
There’s an extremely rich API for positioning and formatting text; see Text Formatting for full details.
-
draw.textbox(text, rect, **kwargs)¶ Draw text, sized to fill the given Rect.
There’s an extremely rich API for formatting text; see Text Formatting for full details.
-
Tip
All of the colours can be specified as (r, g, b) tuples, or by
name, using one of Pygame’s colour names
Rect
The Pygame Rect class is available as a built in. This can be used in a variety of ways, from detecting clicks within a region to drawing a box onto the screen:
For example, you can draw a box with:
RED = 200, 0, 0
BOX = Rect((20, 20), (100, 100))

def draw():
    screen.draw.rect(BOX, RED)
Resource Loading
The images and sounds objects can be used to load images and sounds
from files stored in the images and sounds subdirectories respectively.
Pygame Zero will handle loading of these resources on demand and will cache
them to avoid reloading them.
You generally need to ensure that your images are named with lowercase letters, numbers and underscores only. They also have to start with a letter.
File names like these will work well with the resource loader:
alien.png
alien_hurt.png
alien_run_7.png
These will not work:
3.png
3degrees.png
my-cat.png
sam's dog.png
The resource loader caches loaded images and sounds. To clear the cache (for instance, if you are running into memory issues), use the unload() and unload_all() functions.
Example:
cow = Actor('cow')
loader.images.unload('cow')  # clears the cache of cow.png
loader.images.unload_all()  # clears all cached image files
Images
Pygame Zero can load images in .png, .gif, and .jpg formats. PNG is
recommended: it will allow high quality images with transparency.
We need to ensure an images directory is set up. If your project contains the following files:
space_game.py
images/alien.png
Then space_game.py could draw the ‘alien’ sprite to the screen with this
code:
def draw():
    screen.clear()
    screen.blit('alien', (10, 10))
The name passed to blit() is the name of the image file within the images
directory, without the file extension.
Or using the Actors API,
alien = Actor('alien')

def draw():
    alien.draw()
There are some restrictions on the file names in both cases: they may only contain lowercase latin letters, numbers and underscores. This is to prevent compatibility problems when your game is played on a different operating system that has different case sensitivity.
Image Surfaces
You can also load images from the images directory using the images
object. This allows you to work with the image data itself, query its
dimensions and so on:
forest = []
for i in range(5):
    forest.append(
        Actor('tree', topleft=(images.tree.get_width() * i, 0))
    )
Each loaded image is a Pygame Surface. You will typically use
screen.blit(...) to draw this to the screen. It also provides handy methods
to query the size of the image in pixels:
-
class
Surface¶ -
get_width()¶ Returns the width of the image in pixels.
-
get_height()¶ Returns the height of the image in pixels.
-
get_size()¶ Returns a tuple (width, height) indicating the size in pixels of the surface.
-
get_rect()¶ Get a
Rectthat is pre-populated with the bounds of the image if the image was located at the origin.Effectively this is equivalent to:
Rect((0, 0), image.get_size())
-
Sounds
Pygame Zero can load sounds in .wav and .ogg formats. WAV is great for
small sound effects, while OGG is a compressed format that is more suited to
music. You can find free .ogg and .wav files online that can be used in your
game.
We need to ensure a sounds directory is set up. If your project contains the following files:
drum_kit.py
sounds/drum.wav
Then drum_kit.py could play the drum sound whenever the mouse is clicked
with this code:
def on_mouse_down():
    sounds.drum.play()
Each loaded sound is a Pygame Sound, and has various methods to play and
stop the sound as well as query its length in seconds:
-
class
Sound¶ -
play() Play the sound.
-
play(loops)¶ Play the sound, but loop it a number of times.
Parameters: loops – The number of times to loop. If you pass -1as the number of times to loop, the sound will loop forever (or until you callSound.stop()
-
stop()¶ Stop playing the sound.
-
get_length()¶ Get the duration of the sound in seconds.
-
You should avoid using the sounds object to play longer pieces of music.
Because the sounds sytem will fully load the music into memory before playing
it, this can use a lot of memory, as well as introducing a delay while the
music is loaded.
Music
New in version 1.1.
Warning
The music API is experimental and may be subject to cross-platform portability issues.
In particular:
- MP3 may not be available on some Linux distributions.
- Some OGG Vorbis files seem to hang Pygame with 100% CPU.
In the case of the latter issue, the problem may be fixed by re-encoding (possibly with a different encoder).
A built-in object called music provides access to play music from within
a music/ directory (alongside your images/ and sounds/ directories,
if you have them). The music system will load the track a little bit at a time
while the music plays, avoiding the problems with using sounds to play
longer tracks.
Another difference to the sounds system is that only one music track can be playing at a time. If you play a different track, the previously playing track will be stopped.
-
music.play(name)¶ Play a music track from the given file. The track will loop indefinitely.
This replaces the currently playing track and cancels any tracks previously queued with
queue().You do not need to include the extension in the track name; for example, to play the file
handel.mp3on a loop:music.play('handel')
-
music.play_once(name)¶ Similar to
play(), but the music will stop after playing through once.
-
music.queue(name)¶ Similar to
play_once(), but instead of stopping the current music, the track will be queued to play after the current track finishes (or after any other previously queued tracks).
-
music.stop()¶ Stop the music.
-
music.pause()¶ Pause the music temporarily. It can be resumed by calling
unpause().
-
music.unpause()¶ Unpause the music.
-
music.is_playing()¶ Returns True if the music is playing (and is not paused), False otherwise.
-
music.fadeout(duration)¶ Fade out and eventually stop the current music playback.
Parameters: duration – The duration in seconds over which the sound will be faded out. For example, to fade out over half a second, call music.fadeout(0.5).
-
music.set_volume(volume)¶ Set the volume of the music system.
This takes a number between 0 (meaning silent) and 1 (meaning full volume).
-
music.get_volume()¶ Get the current volume of the music system.
If you have started a music track playing using music.play_once(), you
can use the on_music_end() hook to do something when the
music ends - for example, to pick another track at random.
Clock
Often when writing a game, you will want to schedule some game event to occur at a later time. For example, we may want a big boss alien to appear after 60 seconds. Or perhaps a power-up will appear every 20 seconds.
More subtle are the situations when you want to delay some action for a shorter period. For example you might have a laser weapon that takes 1 second to charge up.
We can use the clock object to schedule a function to happen in the
future.
Let’s start by defining a function fire_laser that we want to run in the
future:
def fire_laser():
    lasers.append(player.pos)
Then when the fire button is pressed, we will ask the clock to call it for
us after exactly 1 second:
def on_mouse_down():
    clock.schedule(fire_laser, 1.0)
Note that fire_laser is the function itself; without parentheses, it is
not being called here! The clock will call it for us.
(It is a good habit to write out times in seconds with a decimal point, like
1.0. This makes it more obvious when you are reading it back, that you are
referring to a time value and not a count of things.)
clock provides the following useful methods:
-
class
Clock¶ -
schedule(callback, delay)¶ Schedule callback to be called after the given delay.
Repeated calls will schedule the callback repeatedly.
Parameters: - callback – A callable that takes no arguments.
- delay – The delay, in seconds, before the function should be called.
-
schedule_unique(callback, delay)¶ Schedule callback to be called once after the given delay.
If callback was already scheduled, cancel and reschedule it. This applies also if it was scheduled multiple times: after calling
schedule_unique, it will be scheduled exactly once.Parameters: - callback – A callable that takes no arguments.
- delay – The delay, in seconds, before the function should be called.
-
schedule_interval(callback, interval)¶ Schedule callback to be called repeatedly.
Parameters: - callback – A callable that takes no arguments.
- interval – The interval in seconds between calls to callback.
-
unschedule(callback)¶ Unschedule callback if it has been previously scheduled (either because it has been scheduled with
schedule()and has not yet been called, or because it has been scheduled to repeat withschedule_interval().
-
Note that the Pygame Zero clock only holds weak references to each callback you give it. It will not fire scheduled events if the objects and methods are not referenced elsewhere. This can help prevent the clock keeping objects alive and continuing to fire unexpectedly after they are otherwise dead.
The downside to the weak references is that you won’t be able to schedule lambdas or any other object that has been created purely to be scheduled. You will have to keep a reference to the object.
Actors
Once you have many images moving around in a game it can be convenient to have
something that holds in one place the image and where it is on screen. We’ll
call each moving image on screen an Actor. You can create an actor by supplying
at least an image name (from the images folder above). To draw the alien talked
about above:
alien = Actor('alien', (50, 50))

def draw():
    screen.clear()
    alien.draw()
You can move the actor around by setting its pos attribute in an update:
def update():
    if keyboard.left:
        alien.x -= 1
    elif keyboard.right:
        alien.x += 1
And you may change the image used to draw the actor by setting its image attribute to some new image name:
alien.image = 'alien_hurt'
Actors have all the same attributes and methods as Rect, including methods like .colliderect() which can be used to test whether two actors have collided.
Positioning Actors
If you assign a new value to one of the position attributes then the actor will be moved. For example:
alien.right = WIDTH
will position the alien so its right-hand side is set to WIDTH.
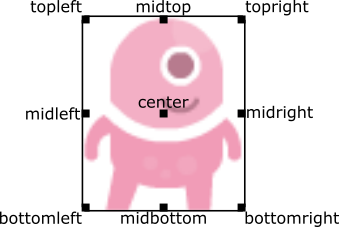
Similarly, you can also set the initial position of the actor in the
constructor, by passing one of these as a keyword argument: pos,
topleft, topright, bottomleft, bottomright, midtop,
midleft, midright, midbottom or center:
This can be done during creation or by assigning a pair of x, y co-ordinates. For example:
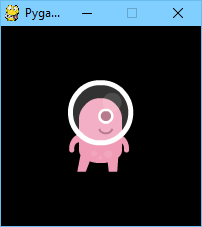
WIDTH = 200
HEIGHT = 200

alien = Actor('alien', center=(100,100))

def draw():
    screen.clear()
    alien.draw()
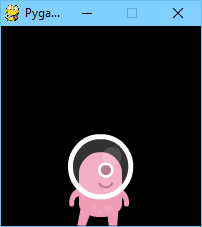
Changing center=(100, 100) to midbottom=(100, 200) gives you:
If you don’t specify an initial position, the actor will initially be
positioned in the top-left corner (equivalent to topleft=(0, 0)).
Anchor point
Actors have an “anchor position”, which is a convenient way to position the
actor in the scene. By default, the anchor position is the center, so the
.pos attribute refers to the center of the actor (and so do the x and
y coordinates). It’s common to want to set the anchor point to another
part of the sprite (perhaps the feet - so that you can easily set the Actor to
be “standing on” something):
alien = Actor('alien', anchor=('center', 'bottom'))
spaceship = Actor('spaceship', anchor=(10, 50))
anchor is specified as a tuple (xanchor, yanchor), where the values can
be floats or the strings left, center/middle, right, top or
bottom as appropriate.
Rotation
New in version 1.2.
The .angle attribute of an Actor controls the rotation of the sprite, in
degrees, anticlockwise (counterclockwise).
The centre of rotation is the Actor’s anchor point.
Note that this will change the width and height of the Actor.
For example, to make an asteroid sprite spinning slowly anticlockwise in space:
asteroid = Actor('asteroid', center=(300, 300))

def update():
    asteroid.angle += 1
To have it spin clockwise, we’d change update() to:
def update():
    asteroid.angle -= 1
As a different example, we could make an actor ship always face the mouse
pointer. Because angle_to() returns 0 for “right”, the sprite we
use for “ship” should face right:
ship = Actor('ship')

def on_mouse_move(pos):
    ship.angle = ship.angle_to(pos)

Remember that angles loop round, so 0 degrees == 360 degrees == 720 degrees. Likewise -180 degrees == 180 degrees.
Distance and angle to
New in version 1.2.
Actors have convenient methods for calculating their distance or angle to other
Actors or (x, y) coordinate pairs.
-
Actor.distance_to(target)¶ Return the distance from this actor’s position to target, in pixels.
-
Actor.angle_to(target)¶ Return the angle from this actor’s position to target, in degrees.
This will return a number between -180 and 180 degrees. Right is 0 degrees and the angles increase going anticlockwise.
Therefore:
- Left is 180 degrees.
- Up is 90 degrees.
- Down is -90 degrees.
Transparency
New in version 1.3.
In some cases it is useful to make an Actor object partially transparent. This can be used to fade it in or out, or to indicate that it is “disabled”.
The .opacity attribute of an Actor controls how transparent or opaque it
is.
- When an actor is not at all transparent, we say it is “opaque” and it has
opacityof1.0, and you can’t see through it at all. - When an actor is completely transparent, it has an
opacityof0.0. This will make it completely invisible.
To make an actor that is half-transparent (like a ghost), you could write:
ghost = Actor('ghost')
ghost.opacity = 0.5
This diagram shows the scale; the grey checkerboard is used to give the sense of transparency:

Tip
The order in which you draw overlapping transparent objects still matters. A ghost seen through a window looks slightly different to a window seen through a ghost.
The Keyboard
You probably noticed that we used the keyboard in the above code.
If you’d like to know what keys are pressed on the keyboard, you can query the
attributes of the keyboard builtin. If, say, the left arrow is held down,
then keyboard.left will be True, otherwise it will be False.
There are attributes for every key; some examples:
keyboard.a  # The 'A' key
keyboard.left  # The left arrow key
keyboard.rshift  # The right shift key
keyboard.kp0  # The '0' key on the keypad
keyboard.k_0  # The main '0' key
The full set of key constants is given in the Buttons and Keys documentation, but the attributes are lowercase, because these are variables not constants.
Deprecated since version 1.1: Uppercase and prefixed attribute names (eg. keyboard.LEFT or
keyboard.K_a) are now deprecated; use lowercase attribute names
instead.
New in version 1.1: You can now also query the state of the keys using the keyboard constants themselves:
keyboard[keys.A]  # True if the 'A' key is pressed
keyboard[keys.SPACE]  # True if the space bar is pressed
Animations
You can animate most things in pygame using the builtin animate(). For
example, to move an Actor from its current position on the
screen to the position (100, 100):
animate(alien, pos=(100, 100))
-
animate(object, tween='linear', duration=1, on_finished=None, **targets)¶ Animate the attributes on object from their current value to that specified in the targets keywords.
Parameters: - tween – The type of tweening to use.
- duration – The duration of the animation, in seconds.
- on_finished – Function called when the animation finishes.
- targets – The target values for the attributes to animate.
The tween argument can be one of the following:
| ‘linear’ | Animate at a constant speed from start to finish | 
|
| ‘accelerate’ | Start slower and accelerate to finish | 
|
| ‘decelerate’ | Start fast and decelerate to finish | 
|
| ‘accel_decel’ | Accelerate to mid point and decelerate to finish | 
|
| ‘in_elastic’ | Give a little wobble at the end | 
|
| ‘out_elastic’ | Have a little wobble at the start | 
|
| ‘in_out_elastic’ | Have a wobble at both ends | 
|
| ‘bounce_end’ | Accelerate to the finish and bounce there | 
|
| ‘bounce_start’ | Bounce at the start | 
|
| ‘bounce_start_end’ | Bounce at both ends | 
|
The animate() function returns an Animation instance:
-
class
Animation¶ -
stop(complete=False)¶ Stop the animation, optionally completing the transition to the final property values.
Parameters: complete – Set the animated attribute to the target value.
-
running¶ This will be True if the animation is running. It will be False when the duration has run or the
stop()method was called before then.
-
on_finished¶ You may set this attribute to a function which will be called when the animation duration runs out. The
on_finishedargument toanimate()also sets this attribute. It is not called whenstop()is called. This function takes no arguments.
-
Tone Generator
New in version 1.2.
Pygame Zero can play tones using a built-in synthesizer.
-
tone.play(pitch, duration)¶ Play a note at the given pitch for the given duration.
Duration is in seconds.
The pitch can be specified as a number in which case it is the frequency of the note in hertz.
Alternatively, the pitch can be specified as a string representing a note name and octave. For example:
'E4'would be E in octave 4.'A#5'would be A-sharp in octave 5.'Bb3'would be B-flat in octave 3.
Creating notes, particularly long notes, takes time - up to several milliseconds. You can create your notes ahead of time so that this doesn’t slow your game down while it is running:
-
tone.create(pitch, duration)¶ Create and return a Sound object.
The arguments are as for play(), above.
This could be used in a Pygame Zero program like this:
beep = tone.create('A3', 0.5)

def on_mouse_down():
    beep.play()
Data Storage
The storage object behaves just like a Python dictionary but its contents
are preserved across game sessions. The values you assign to storage will be
saved as JSON, which means you can only store certain types of objects in it:
list/tuple, dict, str, float/int, bool, and
None.
The storage for a game is initially empty. Your code will need to handle
the case that values are loaded as well as the case that no values are found.
A tip is to use setdefault(), which inserts a default if there is no value
for the key, but does nothing if there is.
For example, we could write:
storage.setdefault('highscore', 0)
After this line is executed, storage['highscore'] will contain a value -
0 if there was no value loaded, or the loaded value otherwise. You could
add all of your setdefault lines towards the top of your game, before
anything else looks at storage:
storage.setdefault('level', 1)
storage.setdefault('player_name', 'Anonymous')
storage.setdefault('inventory', [])
Now, during gameplay we can update some values:
if player.colliderect(mushroom):
    score += 5
    if score > storage['highscore']:
        storage['highscore'] = score
You can read them back at any time:
def draw():
    ...
    screen.draw.text('Highscore: ' + storage['highscore'], ...)
…and of course, they’ll be preserved when the game next launches.
These are some of the most useful methods of storage:
-
class
Storage(dict)¶ -
storage[key] = value Set a value in the storage.
-
storage[key] Get a value from the storage. Raise KeyError if there is no such key in the storage.
-
setdefault(key, default)¶ Insert a default value into the storage, only if no value already exists for this key.
-
get(key, default=None)¶ Get a value from the storage. If there is no such key, return default, or None if no default was given.
-
clear()¶ Remove all stored values. Use this if you get into a bad state.
-
save()¶ Saves the data to disk now. You don’t usually need to call this, unless you’re planning on using
load()to reload a checkpoint, for example.
-
load()¶ Reload the contents of the storage with data from the save file. This will replace any existing data in the storage.
-
path¶ The actual path to which the save data will be written.
-
Caution
As you make changes to your game, storage could contain values that
don’t work with your current code. You can either check for this, or call
.clear() to remove all old values, or delete the save game file.
Tip
Remember to check that your game still works if the storage is empty!