Migrating from Scratch
This tutorial will compare an implementation of Flappy Bird written in Scratch with one written in Pygame Zero. The Scratch and Pygame Zero programs are similar to a remarkable extent.
The Pygame Zero version can be found in Pygame Zero repository.
You can also download the Scratch 1.4 version and Scratch 3 version from the repository.
The Pygame Zero version includes scoring logic, which is omitted in the code examples on this page to make it a closer comparison.
The Python code shown below is re-arranged for clarity within the examples.
The stage
Here’s how the stage is laid out in our Scratch program:
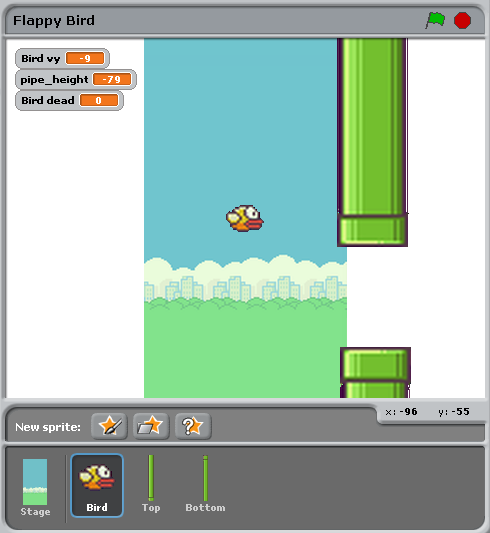
There are just three objects, aside from the background: the bird, and the top and bottom pipes.
This corresponds to the Pygame Zero code setting these objects up as
Actors:
bird = Actor('bird1', (75, 200))
pipe_top = Actor('top', anchor=('left', 'bottom'))
pipe_bottom = Actor('bottom', anchor=('left', 'top'))
In Pygame Zero we also have to ensure we draw these objects. In principle this gives a little more flexibility about how to draw the scene:
def draw():
    screen.blit('background', (0, 0))
    pipe_top.draw()
    pipe_bottom.draw()
    bird.draw()
Pipe movement
The pipes move at a constant rate irrespective of the bird. When they move off the left-hand side of the screen, they loop around to the right, and their vertical position moves at random.
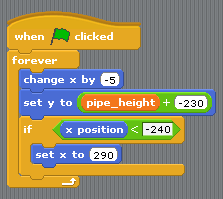
In Scratch this can be achieved by creating two different scripts for the top and bottom pipe.
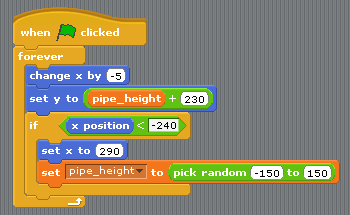
To summarise what’s happening here:
- The condition
x position < -240is true when a pipe is off the left-hand side of the screen, and this is the trigger to reset the pipes. - The
pipe_heightvariable is used to coordinate the two pipes. Because the gap between them should remain the same, we can’t pick both heights randomly. Therefore one of the scripts has this logic and the other doesn’t. - The
set y position to pipe height +/- 230sets one pipe to be abovepipe_heightand the other pipe belowpipe_height.
This code becomes much simpler in Pygame Zero. We could write a single function that updates both pipes. In fact I split it a different way to make it clear that the reset actions go together:
import random

WIDTH = 400
HEIGHT = 708
GAP = 130
SPEED = 3

def reset_pipes():
    pipe_gap_y = random.randint(200, HEIGHT - 200)
    pipe_top.pos = (WIDTH, pipe_gap_y - GAP // 2)
    pipe_bottom.pos = (WIDTH, pipe_gap_y + GAP // 2)

def update_pipes():
    pipe_top.left -= SPEED
    pipe_bottom.left -= SPEED
    if pipe_top.right < 0:
        reset_pipes()
A small difference here is that I can extract values that I want to re-use as
“constants”, spelled in UPPERCASE. This lets me change them in one place when I
want to tune the game. For example, in the code above, I could widen or narrow
the gap between the two pipes simply by changing GAP.
The biggest thing that differs is that there is no forever loop in Python
code. This is the big difference between Scratch and most text-based
programming languages: you must update the game by one animation step and then
return. Returning gives Pygame Zero a chance to do things like processing
input or redrawing the screen. Loop forever and the game would just sit there,
so any loops need to finish quickly.
Pygame Zero calls an update() function when it wants you to update the
animation by one step, so we just need to a call to update_walls():
def update():
   update_walls()
The Bird
The patterns described above for how Scratch logic translates to Python code also apply for the bird logic. Let’s look at the Python code first this time.
The code to update the bird is organised into a function called
update_bird(). The first thing this function contains is some code to move
the bird according to gravity:
GRAVITY = 0.3

# Initial state of the bird
bird.dead = False
bird.vy = 0

def update_bird():
    uy = bird.vy
    bird.vy += GRAVITY
    bird.y += bird.vy
    bird.x = 75
This is a simple gravity formula:
- Gravity means constant acceleration downwards.
- Acceleration is change in velocity.
- Velocity is change in position.
To represent this we need to track a variable bird.vy, which is the bird’s
velocity in the y direction. This is a new variable that we are defining,
not something that Pygame Zero provides for us.
- Gravity means constant acceleration downwards:
GRAVITYis greater than 0. - Acceleration is change in velocity:
GRAVITYgets added tobird.vy - Velocity is change in position:
bird.vygets added tobird.y
Note that the bird does not move horizontally! Its x position stays at
75 through the whole game. We simulate movement by moving the pipes towards
it. This looks as though it’s a moving camera following the bird. So there’s
no need for a vx variable in this game.
The next section makes the bird flap its wings:
if not bird.dead:
    if bird.vy < -3:
        bird.image = 'bird2'
    else:
        bird.image = 'bird1'
This checks if the bird is moving upwards or downwards. We show the bird2
image if it is moving upwards fast and the bird1 image otherwise. (-3 was
picked by trial and error to make this look convincing).
The next section checks if the bird has collided with a wall:
if bird.colliderect(pipe_top) or bird.colliderect(pipe_bottom):
    bird.dead = True
    bird.image = 'birddead'
If so we set bird.dead to True. This is a boolean value meaning it
is either True or False. We can use this to easily check if the bird is
alive. If it isn’t alive it won’t respond to player input.
And the final section checks if the bird has fallen off the bottom (or the top) of the game screen. If so it resets the bird:
if not 0 < bird.y < 720:
    bird.y = 200
    bird.dead = False
    bird.vy = 0
    reset_pipes()
What’s reset_pipes() doing there? Because I’d organised my pipes code to
be a separate function, I can just call it whenever I want to reset my walls.
In this case it makes it a better game because it gives the player a chance to
react when the bird moves back to its start position.
Again, this needs to be called every frame, so we add it to update():
def update():
   update_walls()
   update_bird()
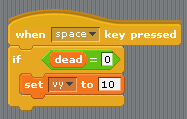
The final part of the bird logic is that it has to respond to player control.
When we press a key, the bird flaps upwards. Pygame Zero will call an
on_key_down() function - if you’ve defined one - whenever a key is
pressed:
FLAP_VELOCITY = -6.5

def on_key_down():
    if not bird.dead:
        bird.vy = FLAP_VELOCITY
Here, if the bird is not dead, we set its vy to a negative number: in
Pygame Zero this means it starts moving upwards.
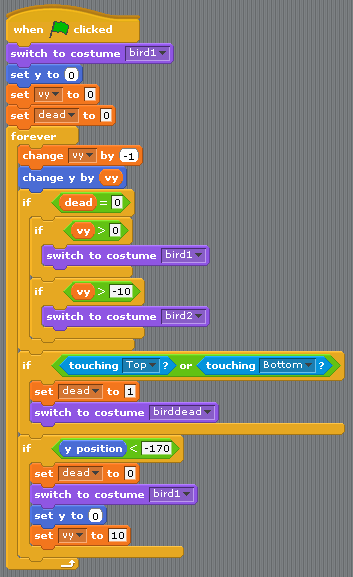
You should be able to find a lot of parallels between the Python code and this Scratch code:
The biggest differences between Scratch and Pygame Zero are these:
- You cannot loop forever in Pygame Zero - just update for one frame and then return.
- The coordinates are different. In Pygame Zero, the top left of the screen is
x = 0, y = 0. Thexdirection goes from left to right as before, butygoes down the screen! This is whyGRAVITYis a positive number andFLAP_VELOCITYis a negative number in Python. bird.deadis a bool, so I can write code likeif not bird.deadinstead ofdead = 0as in Scratch.
Summary
Many of the concepts available in Scratch can be translated directly into Pygame Zero.
Here are some comparisons:
| In Scratch | In Pygame Zero |
|---|---|
change y by 1 (up) |
bird.y -= 1 |
change y by -1 (down) |
bird.y += 1 |
set costume to <name> |
bird.image = 'name' |
if dead = 0 |
if not bird.dead: |
set dead to 0 |
bird.dead = False |
if touching Top? |
if bird.colliderect(pipe_top) |
When Flag clicked…
forever |
Put code into the update() function. |
When [any] key pressed |
def on_key_down(): |
pick random a to b |
import random to load the random
module, then random.randint(a, b) |
| (0, 0) is the centre of the stage | (0, 0) is the top-left of the window |
In some cases, the code is simpler in Python because it can be organised in a way that helps it make sense when you read it.
The power of Pygame Zero’s actors also makes the coordinate manipulation
easier. We used the anchor position to position the pipes, and we were able
to see if a pipe was off-screen by checking pipe_top.right < 0 rather than
if x position < -240.